photo 81949b89-01e9-4b68-9ed7-2f5f0107c4a1_zps643f50f2.png photo 27be1839-4b5a-4876-9e37-0b226c2dd11b_zpsa7cee300.png photo ea055864-8a7a-4a03-8d8e-c2bc3183d188_zpscfef9c29.png photo ff1b7c14-acad-443e-b9bf-100ee7284711_zpsbe9025d0.png

Tuesday, August 26, 2014

DIY Corkboard Jewelry Hanger

As part of my room makeover, I really wanted to utilize the empty space on my closet doors. I thought that DIY-ing a simple corkboard jewelry hanger would be the perfect to solution to add a piece of "art" in my room while also making it extremely functional and convenient. After scouring the internet for simple design ideas, I settled on this dandelion image in silver and white because it is simple, achievable, and impactful. Also, the necklaces and bracelets are the main focus, so I didn't want a busy background detracting from them.
 

What You Need

wood-framed corkboard     acrylic paints     clear push pins     command strips     paint brushes
 (I got everything from Michael's)


What You Do

Because I didn't want to cover it in fabric or paper, I had to paint several coats of white paint to cover the corkboard entirely, and even then it still wasn't completely white because the cork is so porous and absorbent. 
Then, I followed this tutorial to achieve the dandelion image: http://www.prettyhandygirl.com/tutorial-for-painting-dandelion-wall/


I decided to add the pushpins on the ends of the dandelion buds for the attempted "floating away" effect. Decorative handles work as well, but I didn't want to go through the effort of buying them. 


Overall, I am extremely proud of the result, especially because it was affordable and easy to do!


Sunday, August 24, 2014

Summer Nails!

I have recently been obsessed with nail art, and I will be posting more designs for inspiration in the future, but I wanted to first start with two of my favorite floral summer nail designs. 

Tropical Floral Nails

  1. Base coat and 2 layers of white polish
  2. Large neon purple flowers on each nail (or whatever color you want)
  3. Small yellow flowers on each nail
  4. Neon pink centers on the purple flowers
  5. Orange centers on the yellow flowers
  6. Yellow lines/dots/whatever you want on top of the neon pink using a toothpick
  7. Mint green leaves 
  8. Dark green leaves on top of the mint using a toothpick
  9. Wait for the design to dry, then two layers of top coat
Inspired by: http://www.chalkboardnails.com/2012/05/china-glaze-summer-neons-nail-art.html


Daisy Nails

  1. Base coat and 2-3 layers of mint green polish (light blue looks nice as well)
  2. Using a striper, or I just wiped off the brush of a white polish and trimmed the brush to my desired width, paint 3-4 daisies on each nail
  3. Dot the centers of the flowers with yellow polish
  4. Wait for the design to completely dry and add a layer of top coat


Do you love floral nail art as much as I do?


Wednesday, April 23, 2014

JUNIOR PROM

Full of dancing, friends, and (my favorite part) makeup, junior prom was more an extravaganza than merely a dance. The festivities began with a manicure and a sleepover with my good friend, which turned into a day-long effort to get ready with hair, makeup, and the most challenging part of all--fake eyelashes. Here are some pictures from the big day:


with my friends at pre-prom

I went with a friend yay


Accessories

Diane Von Furstenburg Gold Gatsby Glimmer Clutch
Nicole Miller Magnolia Flower Earrings

I got my dress (Reem Acra Florence Gown), earrings, and clutch from Rent The Runway. From the moment I opened the package, I fell in love with each item. Although I was afraid that the dress wouldn't fit because they couldn't send me the backup size of 6L, the 4L was absolutely perfect with 2" heels.


Hair and Makeup


I wanted to keep my hair down to not only show off my short hair (woot woot), but also to counteract the extreme princess vibe my dress was giving off. Don't get me wrong, I loved that I was royal-esque, but I did not want to go overboard and play dress-up by adding an updo to achieve the Belle-from-Beauty-and-the-Beast look. 

Because my dress lacks color and my accessories give it that slight pop, I really wanted to elevate my look by adding in a red lip (also to tie into my red corsage). I didn't want to touch up all night so I used the Stila Stay All Day Liquid Lipstick in Beso, which really did stay all day! This red is really bright and bold so I stayed light on the eyes, with natural eyeshadow, but adding another pop with fake eyelashes. 


Overall, Prom was definitely a memorable addition to my overall high school experience and I am so glad that everything turned out perfectly!


Saturday, March 29, 2014

Runway to Hallway: Spring 2014

Runway trends can often seem elusive to the average high school teenager, so I am going to show you a few outfit ideas for incorporating these high fashion trends into your everyday school wardrobe.

Trend: Florals

Runway 

Looks By: Emporio Armani, Alberta Ferretti, Balenciaga, Mary Katrantzou

Hallway


Trend: Metallics

Runway

Looks By: Rochas, Dries Van Noten, Marissa Webb, Gareth Pugh

Hallway


Trend: White Shirts

Runway

Looks By: Tod's, Akris, Hermès, Balenciaga

Hallway


What runway trends will you be trying out this spring?


Drugstore Makeup Haul

Target is one of my favorite places in the world. I can shamelessly wander around the brightly lit makeup aisles for an hour and feel like all is right in the world. Today, I was on a mission to buy some new drugstore makeup, so of course Target was my immediate destination.


Here's what I got:

This is a repurchase for me. I absolutely adore the formula and the brush because they consistently give me separated, clump-free, long lashes. Also, I've found that even the regular formula does not smudge to underneath my eyes like some other mascaras do. 

This is also not my first time purchasing this product, but I had to get a new one because my last one was leaking all over my makeup drawer. Creamy, long-lasting, and crease-proof, this formula is fantastic for covering darkness under the eyes. I also like to use it around my nose, chin, forehead, etc. for days I don't feel like wearing foundation because it blends into my skin seamlessly. 
I don't have many waterproof mascaras because I think they are a hassle to get off and unnecessary for everyday wear, but I wanted to pick one up to use on special occasions or times when I want my mascara to be really long-lasting. I haven't heard anything about this, but I'm looking forward to giving it a try.

I already have a few of the Just Bitten Kissable Balm Stains so I really wanted to try the other formulas as well. Complex is a peachy nude that is matte, moisturizing on the lips, velvety, and really comfortable to wear. Clearly from my color selection I like nudes because of their versatility, but I do want to try some of the brighter shades. 

Demure is a cool-toned pink that has visible silver glitter, which wasn't evident from the packaging. So far, I prefer the formula of the Lacquer Balm to the Matte Balm because I like the moisturizing finish, but I'm not a huge fan of the glitter particles. I definitely will be buying more of these balms soon though.

I don't ever use lipliner, but I've been wanting to give it a try for quite a while. I wanted to get a mechanical lipliner instead of a pencil, and this was honestly only my choice because it came in a sealed package and hadn't been tested out yet (which is really annoying). Blush is a rosy mid-toned pink that feels slightly sticky and somewhat drying on the lips, even with lip balm underneath, but that might be because of the long-lasting formula. I will have to test it out more and see if I like it.


Have you been shopping recently? If so, what did you buy?


Tuesday, March 18, 2014

Let's Talk Prom Dresses

Spring is here, which means that prom season is also upon us! For all high schoolers out there who can relate, or anyone preparing for a special event, finding that perfect dress is a pretty big deal. I was fortunate enough to not only get my dress for only $70, but also find it and fall in love with it all the way back in October.

My Dress


Reem Acra Florence Gown: Rent the Runway


It is purely personal preference, but I am not a huge fan of the typical prom dresses. I'm not saying that these so-called "typical" prom dresses aren't pretty or anythingin fact, many of them are stunning. It is just not the look or style that I prefer. Therefore, my dress for prom this year will be the Reem Acra Florence Gown from Rent the Runway. It was love at first sight. From the soft layers of tule and twisted ruching of the bodice to the understated nude color, I feel like this dress was made for me. 

Ever since I first discovered Rent the Runway, I have been completely obsessed. I love the idea that I can wear gorgeous designer gowns for an extremely reasonable price. Because I am renting my prom dress, there are some negatives to that as well, such as not being able to alter it, not being 100% that it will fit right, and not being sure that it will be the best dress on you. However, the benefits completely outweigh the disadvantages for me. I'm saving up to hundreds of dollars, I don't have to worry about altering my dress, and I also don't have to feel bad about letting it collect dust in the back of my closet, waiting for a day to be worn again that might never come. I really don't need to keep my prom dress forever. Though it is a keepsake for some, I am probably never going to wear it again (yet if this gown was the prom dress I owned I would wear it every day). 

*Because this post is before my actual prom, I will also be posting a follow-up on my experience with Rent the Runway so look out for that in a few weeks!

This brings me to another point I like about Rent the Runway. It is comforting to read reviews from other girls who have worn this dress before to see what they thought of its quality, design, and fit, because it makes you feel that much more secure about the rental. Looking at pictures posted of the dress on the website is also helpful to see it being worn by normal girls instead by a model for both an idea of what the dress will look like in person and for style inspiration. 

What I love most about prom is that it is an opportunity for me to dress up and enjoy the extended process of getting ready. If you have ever watched the movie A Cinderella Story with Hillary Duff (I almost said Lizzie McGuire there for a second), you know the a scene where Sam is standing at the top of the stairs at her school's halloween party and everyone stops and stares in awe. I'm not saying that my entrance will be as epic as that at all, but I just like to think of that fairytale moment where I get to feel and look like a princess for an evening. 

Hillary Duff in A Cinderella Story

Then again, not everyone wants to look like a princess at prom. You might want to follow the new trends, go with classic elegance, or make a bold statement with head to toe sparkles or a bright fuschia color. Hey, you do you. You should wear whatever makes you feel like a star on that night!


What will you be wearing for your next big event? Will you give Rent the Runway a try?


Loving Your Short Hair

Ever since I cut six inches off my hair in favor of a medium length hairstyle back in December, I have been itching to maintain that hair length. Although I do love all the things you can do with long hair (braids, buns, etc.), I don't like the split and stringy ends or the lack of volume. When I first cut my hair, I loved how I could immediately feel how thick and healthy my hair feltI didn't know that I had that much hair in the first place!

So, when I recently got my hair cut again, I wanted to return to that feeling. To be honest, when I first looked in the mirror and saw how short my hair was, I was absolutely in shock. I was almost in tears. I had asked for a shoulder length hairstyle, with images of Lily Collins and Alexa Chung's medium length messy, textured waves in my mind. However, I ended up with a long bob that took some time getting used to. This was not the stylist's fault, because what she gave me was a long bob with a shoulder-grazing length, but in my mind I had imagined this length when my hair was already curled, not when it was straight. By the time I got home and curled my new hair, it came to the middle of my neck.

How I Learned to Love Short Hair

What helped me get accustomed to my short hair the most was definitely all the compliments I received for my haircut. When you lack self-confidence, though it may seem petty, it helps to get different perspectives and opinions, especially when they are positive and confidence boosting. At school, surrounded by hundreds of girls with long hair, I actually felt proud to stand out from the crowd by taking this unintentional risk. Also, if you play a sport or want to tie your hair up in a ponytail, you still can! (Some bobby pins required.) Based on the super fast and easy styling, along with how it is more cohesive with my personal style, I think my short hair is here to stayat least for now.

My Hair-speration


My Hair Journey

Me with Long Hair (last year):


Me with Medium Hair (3 months ago):


Me with Short Hair (now):


What hair length do you like going for: long, medium, or short?


Monday, March 17, 2014

NOTW: Minimalist Manicure

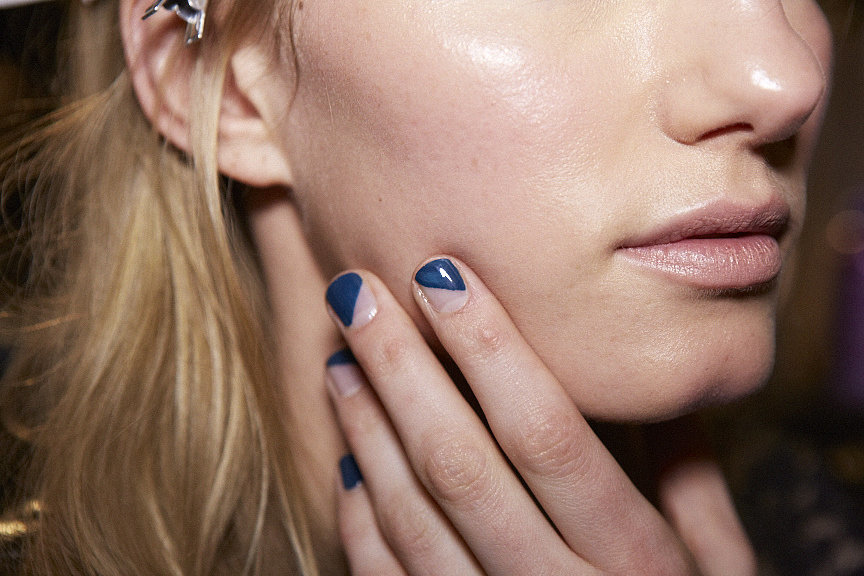
Inspired by New York Fashion Week 2014, along with a desire to do a fast and easy manicure given that it was already 10pm, I chose a minimalistic design for my nails this week. Also known as a floating manicure, this new form of nail design favors only painting part of the nail, letting the natural nail show through.

Paired best with muted fall colors, I think this trend is a modern and fresh way to relieve us from the overly sparkly and intricate nails from the winter season. All it takes to recreate is a steady hand and an eye for straight lines (if you don't have either of these, just tape your nails on a diagonal fill in the space).

Inspiration:

Photo credits to POPSUGAR Australia

My Recreation:


Don't forget to use a base coat and a top coat!

Nail Polish: Revlon Colorstay Longwear Nail Enamel in Blue Slate


What do you think of minimalist manicures?


Friday, February 21, 2014

Baking Soda Changed My Life Forever

For quite a while now, I have been struggling with something: greasy, heavy hair that never ever feels clean. The moment I would come out of the shower, I would already feel like I have product in my hair, especially at the crown of my head. Even when I would double wash my hair, the situation did not improve. I can't believe I didn't see it before--the problem was staring me right in the face--but a few days ago I finally came to the realization that I had product buildup in my hair. 

What is product buildup?

Essentially, it is what it sounds like. Every time you use hair spray, gel, mousse, wax, and even dry shampoo, you are slowly accumulating these products in your hair. The buildup causes your hair to look heavy, dull, dirty, and greasy, even if it is freshly washed. It can make styling your hair extremely difficult (something I can surely attest to) and it can also give you an itchy, flaky scalp.

How do I get rid of it?

Of course the moment my revelation hit, I turned to the internet for some solutions. Aside from a detoxing or clarifying shampoo, which was not an option for me because I wanted an immediate result, I found apple cider vinegar, baking soda, and even hand soap as a solution. The most appealing and well-received home remedy seemed to baking soda, so I gave it a try. 

Photo credits: femiology.com

What you need:

1/4-1/2 cup of baking soda
Water
  1. Rinse your hair with water and massage the baking soda into your scalp. 
  2. Divide your hair into sections, like you would do if you were using dry shampoo, so that you can place scoops of baking soda directly on your scalp, and do that all over your head. 
  3. Add a tiny amount of water and massage the baking soda into your scalp really well. Then leave it in for 5-6 minutes. 
  4. Once you have waited a fair amount of time, rinse your hair and shampoo and condition as usual (try to use natural, sulfate-free products). 
You will immediately feel how light and clean your hair is after this clarifying treatment. 

If you thought the baking soda hair fix was merely a rumor, think again. It actually does work, and it works extremely well! My hair is now light, bouncy, strong, and easy to style again. You don't need to spend your money on a fancy clarifying shampoo, just go to your pantry and you will find a quick, affordable, and effective solution. I plan on repeating this process every week or two because it truly did change my hair care forever.


Give it a try and let me know what you think!


Sunday, January 26, 2014

Nails Of The Week

After about two weeks of nasty chipped nail polish, I finally changed my nail polish yesterday. I was browsing the interwebs for cool designs and this one stuck in my head.

I am not a nail master, please excuse the edges :)

From left to right: Revlon Colorstay Gel-Smooth Base Coat, Circus By Andrea's Choice in Reverso,
Sephora by O.P.I in Dark Room, Revlon Colorstay Gel-Smooth Top Coat

Steps

1. Apply base coat.
2. Base color (2 layers), wait at least two minutes between each coat of polish for it to dry.
3. Use a dried out ballpoint pen or other dotting tool to make dots using your accent color. Start by dotting a line across the tip, then gradually make the dots smaller and smaller towards the middle of your nail.
3. Wait at least 30 minutes for the polish to dry, then apply top coat.

Tips

- Be patient! It took a lot of self-control for me to not apply my top coat a few minutes after I was finished dotting, but it was worth it in the end. You want to wait for each layer to dry to prevent smudging.
- You don't need an actual dotting tool. I just used a dried out ballpoint pen, but you can also use toothpicks, the back of a pin, etc.
- Use colors that contrast to make the design stand out (such as black and white).


Thursday, January 23, 2014

Touching Up Your Makeup

I will begin by saying that apart from blotting, I don't actually touch up my makeup at school. Yes, I do check to see if I have mascara smudging under my eyes, but I don't go out of my way to reapply anything. The reason is that I don't have that much time at school between classes, and makeup isn't really my number one priority when I am at school. However, if I do want to touch up my makeup before I go out somewhere, this is what I do.

TIPS

  • In the bathroom, use a toilet seat cover to blot (also, if you find it embarrassing to blot in public, just use the toilet seat cover while in the stall, no one will see). The material is as absorbent as blotting sheets so it works perfectly!
  • Other than concealer, steer clear from adding more liquid makeup to your face, it can get cakey very quickly. Instead, blend in your existing foundation to bring life back to it.
  • Make sure that you gently wipe away any mascara or eyeliner smudged under your eyes.
  • Use a light hand with powder, only in the areas where you need it (T-zone for me).
  • If your blush has faded throughout the day, add some more to bring back that healthy flush to your face. If you don't have blush on hand, just use your lipstick as a cream blush.
  • Reapply your lip color on clean lips so that it doesn't look blotchy and uneven. Use your finger to blend it in for a more natural look.
  • If your don't want to add more lipstick, put on some lip balm and blend it in for a smooth and polished finish.


Sunday, January 19, 2014

Buying Makeup 101

I'm not really a "buy on the fly" type of girl. Before I purchase any makeup, skincare, or beauty item, I always do a lot of research. Many makeup items can be quite pricey, especially higher-end makeup brands such as Chanel or even NARS. In comparison to drugstore makeup (which is even becoming more expensive than usual), one single makeup item can set you back north of $50. It is often difficult for me to justify making purchases because I tell myself, "You only have one face, how much makeup do you really need?" So I want to make sure that I truly love what I buy and that each product is an investment. 

image from sephoradiaries.blogspot.com
Buying makeup can sometimes be overwhelming, so I usually only buy makeup when I need something, or when I find that one area of my makeup collection is lacking or not up to par. My last makeup purchase was the Make Up For Ever Full Cover Concealer in 5. Here is my process of buying this item:

1. Address The Reason

The reason I wanted this item was because my previous concealer, the MAC Studio Finish Concealer in NW25 was not working well for me. The color of this concealer was far too dark and far too orange for me to use on my face (thanks MAC lady for "color matching" me, you did a really great job). I decided that the next concealer I would buy had to match my skin color perfectly, while at the same time be full coverage to cover up any blemishes or acne scars. 

2. Research

I had already heard a lot about this concealer before, so to do research, I looked for popular reviews on YouTube and online. The concealer is $32, so was not about to just hop down to Sephora and pick one up on a whim. This concealer would last me a really long time because I would only have to use a tiny amount each day, which is a plus. I find that hearing what other people say and feel about the product is extremely helpful, but I still don't stop there. Just because someone else likes something, doesn't mean at all that I will enjoy it as well.

3. SAMPLES

I cannot stress enough how much I believe in sampling makeup products before I buy them. Samples are there for a reason! I have quite sensitive skin, so I want to make sure that if I spend $32 on a concealer, that that concealer will be perfect for me. Also, in the store, lighting can be pretty wacky (MAC lady, I'm talking to you), so it is extremely important to see what the product looks like in natural light. If you use a sample for a week or two, and you still love it, then go ahead and buy it! I get my samples from either Nordstrom or Sephora. In this particular case, I got it from Sephora. 

Don't feel pressured to buy the product immediately when you get into the store. After I asked one lady to color match me for this concealer, she grabbed the product and gave it to me to buy. Just put it back! I feel like so many people don't know that you can ask for a sample, especially in Sephora. You can get samples for liquid items and for loose powders as well (which is how I found out how much I love the Tarte Smooth Operator powder). The employees are often kind and understanding, so don't be afraid to ask them for a sample, they are usually quite generous. In Nordstrom, the samples are more obvious because the makeup brands are slightly more expensive there, and the makeup ladies are also really nice about it (I got samples for my Chanel foundation there before I made the purchase). 

4. Buy It!

I buy my makeup at either Sephora or Ulta, but mainly Sephora because the marketing ploy of the Beauty Insider cards really works on me. I like seeing how many points I have, which is bad for me but good for Sephora because it turns shopping into a game that people want to win at. No shame. Anyways, when you decide that this product is right for you, go and get it. I bought the full size of my concealer when I was almost out of my sample, because you really want to get the most out of it. By following these steps, I find that I rarely ever regret any of my makeup purchases.


Have fun shopping, and remember, SAMPLES, SAMPLES, SAMPLES!


Friday, January 17, 2014

Photo Wall Using Fairy Lights

I'm sure that you have seen several pictures of fairy lights (string lights) used as room decorations and they always look pretty and elegant. Prior to hanging these lights, I had no photographs in my room at all and I was faced with a really empty wall behind my bed. By combining these two elements--using Pinterest for inspiration, I was able to fulfill both of my desires. 


What You'll Need


1. Draw It First

Before you stick any of the hanging clips on the wall, make sure you draw out the pattern or design you want to hang the lights on the wall. This will take a lot of trial and error. I wanted to fill up my entire wall with my lights, so the final design I settled on was a horizontal draping of the lights. Also, make sure that your lights are long enough to reach an outlet! My outlet is right behind my bed near my nightstand so it works out well.


2. Measure It Out

I measured out one and a half feet in and half a foot down from the ceiling to place the top two corner clips. You can mark this with a pencil. These top two clips are probably the most important because they set the basic framework for the rest of your arrangement. Continue to mark out where you want the rest of the clips to be placed (I had three on the right and two on the left). 


3. Place The Clips


These Command clips are great because they can be easily taken off and moved. The actual sticker strips can only be used once, but the clips can be reused. Before you use the clips, you should wipe down your wall with some alcohol--I just used a drop of hand sanitizer--to remove any residue before sticking on the clips. Follow the instructions on the box to properly use the clips and strips. 


4. Step Back


You might not be happy with how you first hang the lights (as you can see above it took me several attempts to get it just right), but once you do get it right, it's like a fairy sprinkled fairy dust everywhere haha.


5. Hang Your Photos


baby me <3

Once your lights look just right, you can decide on what photos you want to display. In total, I used 18 photos, an assortment of old photos of when I was a baby, and some newer ones that I printed out on photo paper off Facebook. I didn't have any clothespins on hand, so I just used some large paper clips to secure the pictures on the lights. It's also great that you can you always add more photos, switch them out, or clip on anything else you want to remember (ticket stubs, notes, etc.).


6. Finishing Touches


For the purpose of function and accessibility, I added another clip right next to my outlet so that I wouldn't always have to reach for the end of the string to plug it in. This makes it really easy to plug and unplug the lights because you know the end won't suddenly fling back and mess up the rest of your arrangement. 


I can't even begin to describe to you how much I love my wall now. Every time I turn on the lights and look at the pictures, I get this fuzzy feeling inside that makes me really happy and thankful for all the wonderful things in my life :)


Thursday, January 16, 2014

REVIEW: Maybelline Instant Age Rewind Concealer

I caved. I know that I am late to the party and there are already several reviews on this product (which has been out for a very long time already), but only during a trip to Target last month did I finally add the Maybelline Instant Age Rewind Eraser Dark Circles Concealer to my makeup repertoire. 

oops that's the french side...my bad
(the bottom says Eraser Dark Circles Treatment Concealer with Goji Berry + Haloxyl)


(awkward photos of me looking off into the distance)            top: WITHOUT concealer   bottom: WITH concealer
This photo is with one generous layer of concealer on clean skin, and you can clearly see that it covers the redness around my nose and the dark purple under my eyes. My dark circles are obviously not that severe, but this concealer does do a really good job at covering them up. If you do have issues with severely dark circles, you will probably want to find a concealer that is more full coverage. 

When I first bought this concealer, I immediately ripped off the packaging and applied it in the car. Honestly, I was blown away by how lightweight, smooth, and easy to blend the concealer was. It also made my skin feel really soft! It has light to medium coverage and looks great with or without foundation underneath.

Color

Another thing I love about this concealer is that the color is an exact match for my skin color. It is a tiny bit more pink than my skin color, but it works well to contrast the darkness under my eyes. Because the color is exactly my skin color, it is not as brightening as it could be, but there is a Brightener (and a Neutralizer) shade in the range. The color range is quite limited (Fair, Light, Medium, Honey) so that is a deficiency of the product range as a whole.

Applicator

It has a sponge applicator--which can be unsanitary--that dispenses the product by twisting the red collar in the direction of the arrows, but it works great when you are in a rush. I wouldn't recommend trying to blend the concealer in using the applicator, but rather use it to place the product to conceal any darkness under your eyes or redness.  

Formula

However, I think the formula is a bit too dry for my liking, especially since if I have any dry patches in that area, the product will cling to them and be really noticeable up close. On the other hand, throughout the day, the concealer doesn't crease and it stays put well when there is a layer of powder on top. I have oily skin so I need the powder, but if you have drier skin then you can skip that step. 


I use this Real Techniques Deluxe Crease Brush to blend in the concealer since it is the perfect size and it is extremely soft. You really want to blend the product in immediately or else it will set and be difficult to work with. This also relates to how it is moisturizing, but not as moisturizing as some other concealers are.

OVERVIEW
If you are on a budget, or are looking for a great drugstore under eye concealer option, you should really check this out. Despite its few shortcomings, this product can still hold its own alongside pricier high end concealers.


Wednesday, January 15, 2014

HOW TO: Instantly Look Put-Together

We all want to achieve the best possible result while putting in the least amount of effort. However, when you are getting ready, it can sometimes be difficult to come up with a look that is both simple and put-together. In the mornings, if I ever feel like I look unpolished or incomplete, this is what I do.


1. Add a Black Blazer

If you have to transition a day look into a night look, or be business appropriate for an event, making a strong first impression is crucial. No matter what you are wearing--whether it be a floral print dress or a collared blouse--you can consistently add a black blazer to polish up any look. This type of tailored jacket instantly elevates any outfit, and black is a universal color that is flattering and functional. Getting ready always seems to come down to a few rushed minutes, so if you're in a bind and need to put something on fast as a final touch, you can easily throw on a black blazer and achieve that look. Having this piece on hand will transform you into looking like you are wearing an outfit rather than like you haphazardly grabbed the first clothes you could find. This tuxedo jacket from H&M is perfect because it has the right cut and slightly oversized feel to suit anything underneath.

2. Brush Your Hair

No, I don't actually have a Mason Pearson hairbrush. Maybe one day though...

It sounds silly and somewhat obvious, but you really don't want untamed hair when you are going for a put together look. Smooth and shiny hair in almost any style will get rid of that "just rolled out of bed" appearance that detracts from the rest of your outfit. As we all know, good hair is like an added accessory that has the power to complete any look. Knotty hair is obvious, so if you don't have time for anything else, brush your hair and get one step closer towards looking put-together.

3. Add One Statement Accessory

When wearing any outfit, you can sometimes look like there is something missing. This emptiness can be filled by a scarf, necklace, or even statement bracelet that draws attention to one specific feature. For instance, a statement necklace draws attention to your neckline and up, and it is a fun way to add a pop of color or shine for dimension. With scarves, the rule I always follow is that if I am wearing a solid color, then my scarf will be a printed or colorful, and vice versa. This creates a sense of balance in your outfit that makes it look like you have put in a lot of effort when you really haven't. The necklace I am wearing in the photo above is more of a quiet statement than the chunky ones are (like this one from BaubleBar) but really whatever you feel comfortable with will work best for you. 

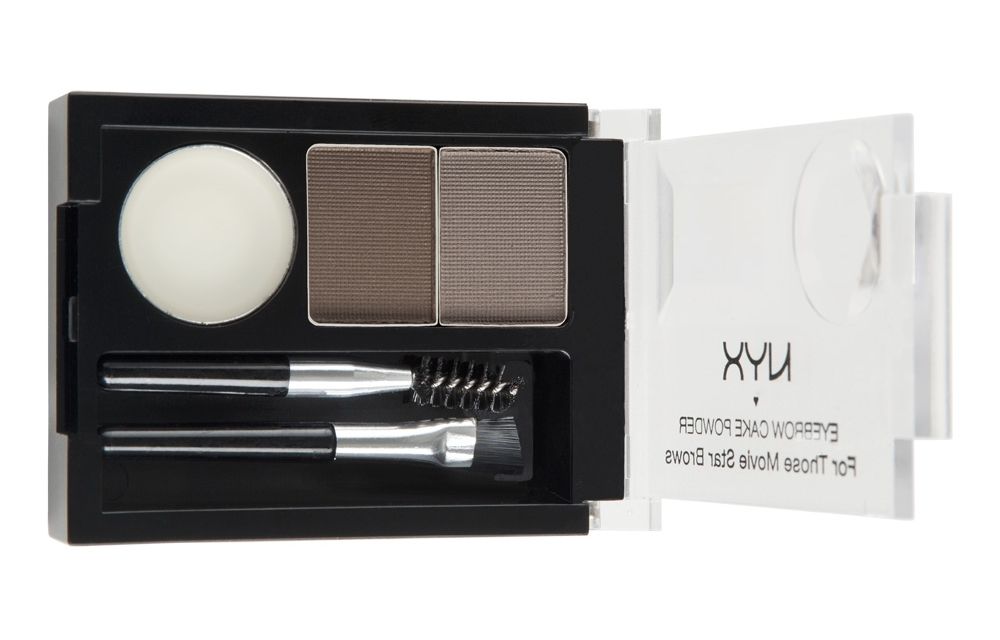
4. Fill In Your Brows

NYX Eyebrow Cake Powder in Taupe/Ash
Even for those of you who don't wear makeup, filling in your eyebrows is a way to immediately look polished and refined. There has definitely been a focus on strong, bold eyebrows in the beauty industry for the past couple of years, and it really is well-deserved. Eyebrows frame your eyes and complete your face. This final step of a well-defined brow is the fastest and simplest way to complete your new "put-together" style. To see what I use to fill in my brows check out my post "All About My Eyebrows".